
Introduction
Putting on a screen protector can be kinda annoying, especially when those dust specks, little bubbles, or alignment problems show up and mess everything up. Luckily, most newer screen protector kits come with a guide sticker thing that is meant to help you line it up just right. So if you just got a tempered glass panel or any screen protector and you’re thinking, “okay, how do I use that guide sticker,” this guide should take you through the whole process, start to finish.
No matter if you’re shielding a smartphone display, a tablet screen, a smartwatch screen, or even a laptop panel, knowing how the guide stickers function can save you a bunch of time and also keep you from making expensive mistakes later.
What Is a Screen Protector Guide Sticker?
A screen protector guide sticker is this small adhesive sticker, usually included in a lot of screen protector installation kits. It is mostly for helping you align the screen protector accurately right before you do the final installation part, you know.
In use, guide stickers work kind of like temporary hinges, so you can position the protector neatly on your device screen without fighting it too much. They help lower the chances of misalignment, unwanted bubbles, and dust contamination , especially when you’re applying it for the first time.
Why people like guide stickers, benefits you could say:
– Easy screen protector alignment
– Cuts down installation errors
– Helps prevent dust contamination
– Supports a bubble-free finish
– Works for beginners, also for professionals, no big deal
Items You Need Before Installation
Before applying your screen protector, gather the following items:
- Screen protector
- Guide stickers
- Dust removal sticker
- Alcohol cleaning wipe
- Microfiber cloth
- Device with a clean screen
- Well-lit, dust-free workspace
Preparing all materials beforehand makes the installation process smoother and more effective.
Why Proper Alignment Matters
A poorly aligned screen protector can:
- Cover camera sensors
- Interfere with touch sensitivity
- Leave screen edges exposed
- Look unattractive
- Cause premature lifting
Using guide stickers ensures that the protector sits correctly on the display and offers maximum protection.
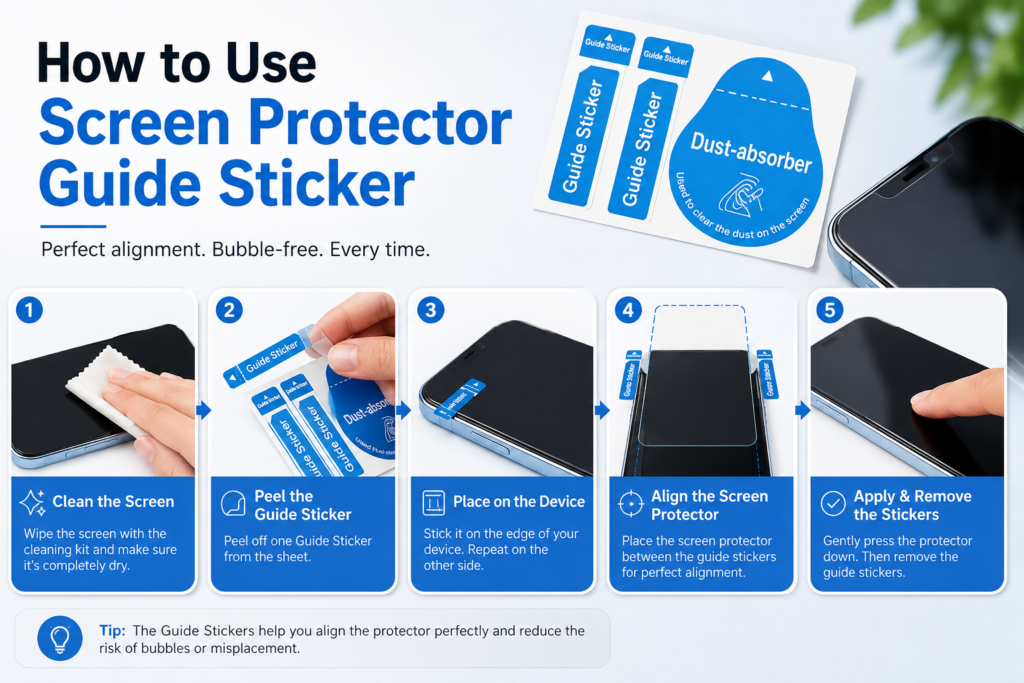
Step-by-Step Guide: How to Use Screen Protector Guide Sticker
Step 1 Clean your screen, thoroughly
First off the most important move is cleaning your device screen, like really well.
Grab the alcohol wipe in the installation kit. It’s there to cut through fingerprints, oily smears, and general dust.
After that, take a microfiber cloth, dry the surface completely, don’t rush this part.
Then, check the display under bright light just to be sure there are no leftover marks or little particles, hidden in plain sight.
Step 2 Position the screen protector
Leave the protective film on the adhesive side, don’t peel it yet.
Now lay the screen protector over your device.
Align things carefully, like
camera cutouts
speaker openings
edge borders,
sensor zones
Take your time, because right placement is crucial it’s one of those silent make or break steps.
Step 3 Attach the guide stickers
Once everything lines up, add two or three guide stickers along one side of the screen protector.
Most people put them on the left edge or up near the top edge.
These stickers basically act like a hinge setup, so the protector stays in the right spot even when you lift it a little.
Pro Tip
If you’re doing something bigger, like a tablet , use more guide stickers. It helps a lot with steadiness during the install.
Step 4 Create the hinge action
Press the guide stickers down firmly, so they stick to both the screen protector and the device.
Then lift the screen protector slowly, using the hinged side.
The protector should swing open like a book cover, while still staying aligned.
That hinge behavior is the main advantage of guide stickers.
Step 5: Remove Dust Particles
Before you do the very last installation, grab the dust removal sticker and try to get rid of any leftover dust bits on the screen. Even just one tiny particle can end up making noticeable bubbles, yeah. Look at the display from a few different angles, especially under bright lighting. If you still see specks, repeat the dust removal step again.
Step 6: Peel Off the Adhesive Backing
Now, carefully remove the protective film from the adhesive side of the screen protector. Try not to touch the adhesive area with your fingers at all, it kinda ruins the whole thing. Finger marks can interfere with both adhesion and clarity.
Step 7: Lower the Screen Protector
Using the guide sticker hinge, slowly lower the screen protector onto the display. Start on the hinged side, then let it rest down and settle on its own, nice and steady. Most tempered glass protectors have an automatic adhesion system, so the adhesive can spread more evenly across the screen.
Step 8: Remove Air Bubbles
After installation, you might notice a few small air bubbles. Take a microfiber cloth or an application card and gently push the bubbles toward the edges of the screen. Do it from the center outward, don’t rush. Usually most bubbles are gone within a few hours, sometimes sooner.
Step 9: Remove the Guide Stickers
Once everything is fully attached, peel away the guide stickers. Take your time and remove them slowly, so you don’t accidentally lift the screen protector edges. And that’s it, your installation is done.
Common mistakes to avoid
1. skipping screen cleaning
Even a tiny dust particle can just ruin the installation, like really. Clean the display thoroughly first before applying the protector.
2. touching the adhesive side
Fingerprints on the adhesive surface can cause bubbles , and then the adhesion is poor. Handle the protector only by its edges, no thumbs in the middle.
3. rushing the alignment process
Take your time to align the protector properly before you attach the guide stickers. A correct alignment prevents issues later, seriously.
4. installing in a dusty environment
Try to avoid it near: open windows, fans, air conditioners, dusty surfaces. Bathrooms after a hot shower often feel dust free, so they can work , in a pinch.
5. using too few guide stickers
Bigger devices may need extra guide stickers to keep accurate alignment.
Tips for a Perfect Bubble-Free Installation
Follow these expert tips, ok:
Wash your hands first, before installation.
Use bright lighting, not dim.
Work on a clean surface, keep it tidy.
Turn off fans and air conditioners, or it gets messy.
Use dust removal stickers, more than once if needed.
Align carefully before you peel the adhesive backing, or the fit gets awkward.
Apply gentle pressure from the center outward, slowly.
Honestly these techniques boost installation success rates quite a lot.
Are Guide Stickers Necessary?
Technically, you can install a screen protector without guide stickers. But, honestly the whole thing feels more complicated, and you can end up having to adjust things a lot. Still , guide stickers make the process much easier and more precise.
If you are a first time user, guide stickers are really recommended, because they:
– help improve alignment accuracy
– lower the chances of installation errors
– save time
– prevent wasted screen protectors
Most premium tempered glass manufacturers include guide stickers for that reason.
Can You Reuse Guide Stickers?
Guide stickers are made for temp use, not really for the long run. Even if they still seem kind of sticky after you peel them off, reusing them again is usually not a great idea. Brand new guide stickers, on the other hand, bring more holding power and a cleaner alignment, which matters more than people think. If you’re out and you need replacements, a standard low tack adhesive tape can work as a decent stand in.
Frequently Asked Questions
1 What do guide stickers even do?
Guide stickers help you line up the screen protector just right, before that final install thing, and they also act as temporary hinges during the whole application process.
2 Can I put on a tempered glass protector without guide stickers ?
Yes, you can, but it becomes way more tricky , and the chances of it getting misaligned go up.
3 How do I get rid of dust before installation?
Use the dust removal sticker that comes inside the installation kit , then check the screen again in bright light, just to be sure.
4 Why are bubbles showing up after I install it ?
Bubbles usually show because there’s trapped air, or maybe tiny dust particles. Most bubbles end up fading on their own within 24 hours, so don’t panic too fast.
5 Can guide stickers mess up my phone ?
Nope. They use low-tack adhesive , and they are safe for phones, tablets, and other devices too.
Conclusion
Learning how to use a screen protector guide sticker can really change your whole installation experience, like a lot. These little tools, still simple but quite effective, help you line everything up more precisely and they also cut down on bubbles , and you avoid those pricey “oops” moments during setup.
If you follow the step by step way from above, cleaning the screen first, making a guide sticker hinge, removing dust properly , then slowly lowering the protector, you end up with something that looks pretty professional, even if you’re at home doing it yourself.
And whether you’re putting tempered glass on a smartphone, a tablet, or some other gadget, guide stickers can make the process faster, smoother, and more accurate. Next time you install a screen protector, just don’t skip the guide stickers… they really can make all the difference.